Monday, January 28, 2019

NEED A HUG???

Hi, There!

Well, who doesn't need a hug now and then to make you feel better?  I love hugs - always have and I am a good hugger in return!!!  Just wish my sister lived closer so I could give her a big hug!!!  But since that will not happen anytime soon, yes, you guessed it, - this card is for her!!!  This is a Stamping Bella image and it was so much fun to color up and those little critters are just so cute - I am not sure which is Maisy and which is Gilbert - sorry!!!  I need to check out the website and you can check it HERE.  Thanks for stopping by and hope you get some nice hugs from someone too!  As usual, hugs and blessings ~ CaroleAnn

Card Recipe
Image/ #Stamping Bella Gilbert and Maisy under the toadstool  
Copic Markers:  R22 24 27 29 89  YG0000 01 21 G85
E51 53 55 35 01 04  C1 2 4 5 E00 01  G43 94
The image was die cut with Tuttidesigns rectangle stitched die and edges distressed with Distress Inks Chipped Sapphire and Seedless Preserves.  DPs from Recollections/Habitat.  From the same papers, I fussy cut the moth and one of the moths' wings to add for dimension.  Added the mushrooms and applied with 3D dots.  Applied Stardust to the wings of the moths and here and there for ground cover.  Wink of Stella added to the critters, white gel pen to mushroom and Glossy Accents for raindrops.

Sharing this card with:
Get Creative Challenge  #76- January - ATG
Pammie's Inky Pinkies #1904 - ATG
Paper Girls #168 - Sparkle and Shine


Wednesday, January 23, 2019

YOU ARE THE TWEETEST!

Hi, There!

When I was younger, my sister and I had a parakeet named Peter and he was a beautiful color of green and yellow!  So I just fell in love with this image and knew I would be making a card and sending this to my sister.  We have some fond memories of this very social bird called Peter!!!!

Now I am owned by a cat named Sam!!!  He is a ginger and white, green-eyed love!  Don't we love our pets, they do take a special place in our hearts.

Thanks for stopping by, hugs and blessings ~ CaroleAnn

Card Recipe:
Digital Image/MoManning/Tweetie
Colored with Copic Markers:
Skin E0000 E000 E00 E11 E02 E93 E95  Hair E70 E71 E74 E77  Bird Y08 YG13 YG07 Y15
Outfit BG13 BG18  YR82 YR02 YR68  R81 R83 R85
Designer Papers used Simple Life/Echo Park


Tuesday, January 22, 2019

AWWWW! YOU SHOULN'T HAVE - BUT THANK YOU!!!

Hi, There!

We all need thank you notes in our card stash so I decided to make two from this precious stamp image from Stamping Bella-Bedelia The Bunny!!!!  So cute and fun to color.  I did fussy cut her out and used lots of Wink of Stella on her fur.  The background I made with a cloud stencil and distress ink/Broken China.  The grass I drew in with colored pencils.

Digital image colored with Copic Markers:  E50 E30 E51 E02  Y13 Y15 Y38 Y28  V01 V12

Thanks for stopping by, till next time, hugs and blessings always
CaroleAnn


Saturday, January 19, 2019

FEEL BETTER SOON

Hi, There!

Seems to be a lot of sickness going around and I am hoping to stay clear of all those germs!!!  So I need "get well" cards and started with this adorable image from Stamping Bella - those adorable chick collection stamps. 

Homemade chicken soup - nothing like it when you have a cold or flu.  I like it with saltine crackers with butter on them;)  But these chicks are just having a swimming good time in the soup!!!!  LOL

Stay warm and safe if you are in the path of this big storm!!!  We have lots of snow and ice coming our way here - good weekend for card making or binge-watching my favorite shows!!!!  Big hugs and blessings ~ CaroleAnn

Card Recipe
Stamping Bella stamp colored with Copic Markers and added stardust glitter here and there.  Die cut the image with a stitched frame and used a Stampin Up gingham background.  Added distress ink around the stamped image.  Sentiment applied with 3D foam.  Fun image to color!!!

Thursday, January 17, 2019

LOVE U TO BITS - Another Designed Card

Hi There!

Just had to do another card with this cutie on the front for Valentines Day!  Thanks for taking a peep.  Hugs and blessings ~ CaroleAnn

Scroll down for the first post of the day - if you are interested.  Thanks,  CaroleAnn


SPECIAL FOLD VALENTINE CARD

Hi, There!

Just wanted to color this cutie up and she is perfect for a Valentine Card.  The fold idea I received from Wendy Cranford/Luvin Stampin, Stampin Up - Thank you, Wendy!  So without further a-do here is my card - three photos so you get the idea of how it opens.  I changed one element on this as the front of the card that opens is actually attached to an A2 size note card so I have more room to write a note!  Thanks for stopping by - hugs and blessings ~ CaroleAnn

Closer on the front is a heart die with lots of glitters and held in place by a heart clip.  Once you unclip it you have this part of the card showing:
Digital sentiment from MoManning, die cut with same size heart as on the front closing of the strip of cardstock and outlined in stardust glitter - open that flap and you have this:
Digital Image/MoManning/Love You To Bits
She has been fussy cut and popped up with 3D foam dot.
Colored with Copic Markers and her boots have glossy accents and the heart is covered in stardust glitter.  A fun card to make!!!  This is a 4 1/4 x 5 1/2 card base.

Sharing this card with
The Crafty Addicts #56 ATG/with option
The Paper Shelter #366 - Digital Image
The Sisterhood of Crafters - Make It Sparkle
Word Art Wednesday Weeks #370-#371 - ATG


Sunday, January 6, 2019

TAKE5 ART JOURNAL FOR MONTH OF JANUARY 2019

Hi, There!

I have decided to make 2019 about more than just card making for me.  There is a group of very talented ladies that are involved in Take5 Art Journaling and they take turns picking 5 prompts for an art journal project.  I found this thru Youtube and I met the sweetest lady, Kyra Pace on her Take5 Art Journal Collaboration page and I have been watching her Youtube spot ever since  -  here!!!

So much fun and inspiration.  So these were the prompts for this month of January 2019:
1.  Coffee or Tea - for me I used the Distress Ink called Tea Dye for the background
2.  Color pink - again Distress ink Worn Lipstick for my background
3.  Yarn or lace - I have lace at the bottom
4.  Stamp - lots of stamping for me on these pages both for background and main quote.  The torn picture I added is from a watercolor I did about a month ago for a card ( I did draw the trees or attempt to draw is more like it ) - but it never made it into that creation so I just added it here since the color scheme was perfect.  See - never throw away any unused artwork;) 
5.  Add a literature quote.  Mine is stamped from a stamp set from Wordsworth/Nature

I had to add glitter for the fairy's wings and around the quote and some around the trees and in the sky.

It was so much fun to use prompts and just go with the flow.  Hoping to use my art journal books more often now - forgot how much fun it can be!!!  Blessings to all and hugs ~ CaroleAnn

Journal Recipe
Background painted with Ranger distress inks using a baby wipe.  Stamped circles from PaperArtsy stamp set in Sepia Archival Ink as I did the same with the trees and the text stamp.  Birds, and quote from Wordsworth stamp set and stamped in Black Archival Ink.  Fairy from Graphic 45 stamped in the same ink.  I used Gel Medium to apply the torn watercolor picture of the trees.  Glued the lace down at the bottom.  Added Stardust Stickles here and there!

Friday, January 4, 2019

A MINI FLIP ART JOURNAL BOOK Note: Photo Heavy Post

Hi, There and Happy New Year!!

Hope everyone had a wonderful Christmas and holidays celebrated with family and friends.  

I started my New Year off with something new for me - trying my hand at an envelope flip book.  I watched many, many, Youtube videos until I felt secure in trying this.  So I am experimenting on my sister by sending her the first one I made.  It is my way of celebrating my sister!  She is the best friend I have.

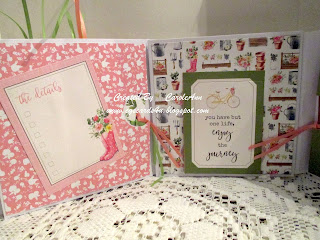
The next flip envelope books I make will only be 3 or 4 envelopes but her flip book is 8 envelopes - 15 pages to decorate!!!!  What fun I had and a great way to use up some of these scrapbook pages I have and just not wanting to make cards with them.  The paper set used here is from Carte Bella/Spring Market set. 

So here it is and she can open many pockets and pull out large tags etc. for photos and/or journaling.  I can't do a video so you miss some of the pull apart fun with this project!  I am now taking a break and will go back to something simple - like making a card!!!  LOL  Big hugs and blessings ~ CaroleAnn

 COVER   Tied together with a bow.  Used 3D foam for the bottom portion of the front cover and added flowers, doily and heart clip.
Page 1  Booklet inside pocket with a note for her.  Page 2  Tags tucked in behind a flip tag
 Page 3  Has a side pocket that she has a large tag inside of it for photos or journaling
Page 4   A flip tag that has two more tags behind it for journaling
Page 5 A belly band with tag inserted and a side pocket with goodies inside.
Page 6 Sideband with another tag tucked in.
Page 7  Has a tag that is holding in place the page (joy) that opens up to reveal tags and notes
Page 8  A band that holds another tag and the pages can be used as is for photos
Page 9 Has a tag on front and a side pocket with more goodies inside
Page 10 will open to the right to reveal two pages behind it (see below).  Tag flips up to reveal a sticker that is a bike.
 Page 11 and Page 12
Page 13 is the one on your right with the wellie - I love these boots!!!  And another side pocket with tagged goodies.

If you made it this far - thanks for taking the time to see what I attempted!  Not perfect but it was so much fun to put together and I am sure I will get better at this as I go along.  Great way to use up your stash in paper, stickers, envelopes etc!!!

Sharing this mini journal book with:
SIMON SAYS MONDAY CHALLENGE 
SIMON SAYS WEDNESDAY CHALLENGE
CREATALICIOUS CHALLENGE #154
CRAFTING WITH AN ATTITUDE #47
CUTE CARD THURSDAY #563 ATG
NOT JUST CARDS CHALLENGE BLOG